Taking payments
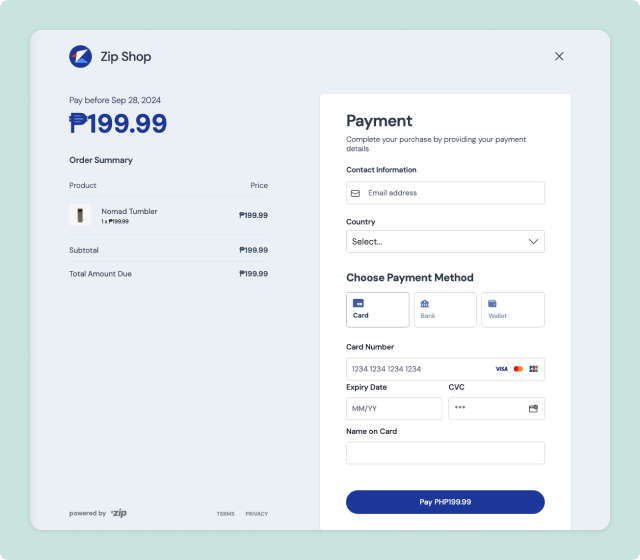
Taking payments with Zip means sending customers to a checkout. Our checkout page let your customers pay for their order using various payment methods including cards, online banking and digital wallets.
To integrate with Zip, you need to send customers to a checkout and then after payment is complete save the payment data to your system.
About checkout URLs
You can create checkout whenever your customer is ready to pay.
A checkout URL looks like this:
https://pay.zip.ph/{SESSION_ID}
You can create a checkout URL by creating a Checkout Session on your server and then redirecting to the URL returned by the API.
Checkout URLs are valid for 24 hours after creation. After that, the URL will expire and you will need to create a new one.
How to create checkouts
Using the Checkout Sessions API, you can create checkouts on-demand and with more flexibility.
To create a checkout with the API, send a POST request with your desired configuration.
The most basic request contains required fields like currency, line_items, cancel_url, success_url and payment_method_types.
curl https://api.zip.ph/v2/sessions
  -u "{API_KEY}:" \
  -H "Accept: application/json" \
  -H "Content-Type: application/json" \
  -d '{
    "currency": "PHP",
    "line_items": [
      {
        "name": "Zip Shirt",
        "amount": 5000,
        "quantity": 1
      }
    ],
    "cancel_url": "https://example.com/cancel",
    "success_url": "https://example.com/success",
    "payment_method_types": ["card"]
  }'
The response from this request looks like this:
{
  "id": "cs_iQ4ecysLNGJKccHD",
  "object": "checkout.session",
  "amount_subtotal": 5000,
  "amount_total": 5000,
  "bank_code": null,
  "branding": { ... },
  "billing": null,
  "billing_address_collection": "auto",
  "cancel_url": "https://example.com/cancel",
  "client_reference_id": null,
  "created_at": 1727792437813,
  "expires_at": 1727799638134,
  "currency": "PHP",
  "customer": null,
  "customer_name": null,
  "customer_email": null,
  "customer_phone": null,
  "customer_name_collection": true,
  "description": null,
  "line_items": [{ "name": "Zip Shirt", "amount": 5000, "quantity": 1 }],
  "livemode": true,
  "locale": "en",
  "merchant": { "name": "Zip Shop" },
  "metadata": {},
  "mode": "payment",
  "payment_details": null,
  "payment_method_types": ["card", "bpi", "gcash", "maya"],
  "payment_status": "unpaid",
  "payment_url": "https://pay.zip.ph/cs_iQ4ecysLNGJKccHD",
  "phone_number_collection": false,
  "require_auth": true,
  "shipping": null,
  "shipping_address_collection": null,
  "submit_type": "pay",
  "success_url": "https://example.com/success",
  "last_updated": 1727792438134
}
The payment_url in the response is the unique URL for your specific checkout session.
A common flow for using a checkout URL involves sending an API request to generate the checkout when your customer clicks a “Checkout” or “Pay” button in your app. Once you receive the response, you can easily redirect the customer to the provided URL.
No matter your use case, once the checkout URL is in your customer’s hands, they can complete their payment anytime, anywhere—smooth, simple, and convenient! 🚀
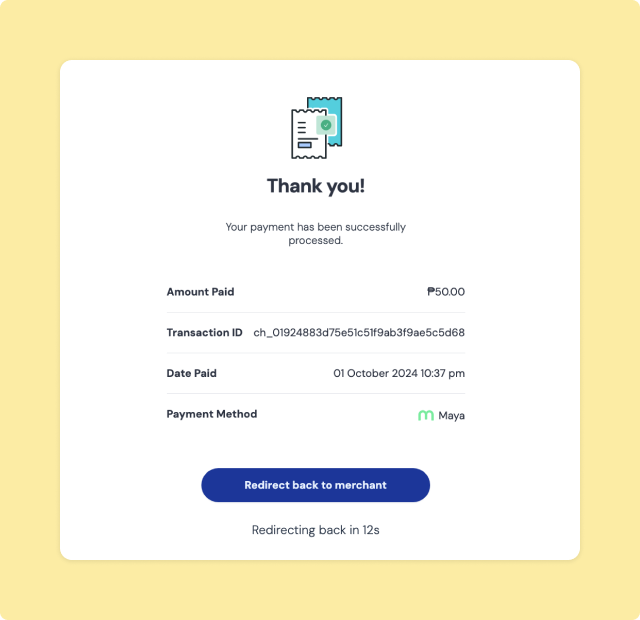
After the checkout
The checkout is just one part of the purchase journey, but what happens after payment is just as important! Getting this part right helps ensure a great experience for your customers.
Once a payment is successfully processed, your customer will be redirected to the success_url you provided when creating the checkout. This is the perfect place to show a confirmation message, thank your customer for their purchase, and offer any additional details they might need—like order info or next steps.
Saving checkout payment data in your database
After the checkout redirects to your success page, it’s a good idea to save the payment data for your records. Simply grab the session_id from the URL query parameters, use it to fetch the session details via the API, and save the payment info in your database for future reference.
const sessionId = new URLSearchParams(window.location.search).get('session_id');

fetch(`https://api.zip.ph/v2/sessions/${sessionId}`, {
  method: 'GET',
  headers: {
    'Accept': 'application/json',
    'Content-Type': 'application/json',
    'Authorization': `Basic ${SECRET_KEY}:`
  }
})
  .then(response => response.json())
  .then(data => {
    // Save the payment data in your database
  });